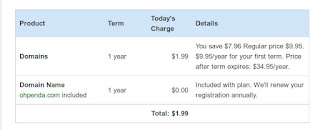
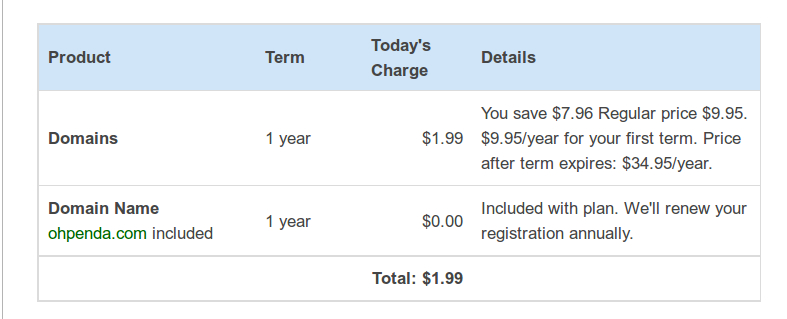
If you didn't already know, Yahoo! Small Business is offering to host your domain for $1.99/yr! Yes, you saw that right! it's $1.99/yr! Check their website if you're still not convinced. It's no gimmick! Oh wait, maybe it is. The CATCH: the recurring charges worth $34.95. But I figured that if I transferred domain hosts before the end of my term, I'll be fine. Google would probably be my best option then, as they only need $10/yr.
1 - Register a Y! domain and make sure you pay (like duh).
2 - Let the people from Y! Domains know you have a blog somewhere.
*** You need to wait for Y! Domains to update your DNS settings. This may take an hour or so.
** this is using the updated Blogger interface **
Read More
Anyway, I had a great time trying to transfer my blog to the new domain. It was quite time consuming because I'm such a noob to domain-relocation, as you've probably guessed by now. But this is for the noobs out there who need all the help they could muster. I admire your efforts to elevate your noob standards, my friends. To all the non-noobs: keep in mind that though this things might be obvious to you, it's clearly not to everybody, so stop being sore winners!
Okay, enough whining from me. Here's what we need to do:
1 - Register a Y! domain and make sure you pay (like duh).
*** before you proceed, I think it's worth mentioning that you wont be able to view your domain until .. a while. Y! Small business told me I wouldn't propagate the webiverse until 72 hours but not more than 2 hours later, I got an email saying my domain is active. It's sooner than I expected but hey, who's complaining?
*** but just in case your domain is still inactive, have two options: (1) bookmark this page and come back later or (2) proceed [you wont see your blog yet, only when it gets activated later] If you choose the latter:
2 - Let the people from Y! Domains know you have a blog somewhere.
- Go to the Y! Domains Homepage and log-in.
- Click the button on the right which says 'Access Your Account' or simply click here.
- Click 'Domain Control Panel' directly under Go To.
- Click'Manage Advanced DNS Settings'
- Click 'Add Record'
- In the Source field, enter only the subdomain you want to use. For example, if you designated www.domain*.com as the address of your blog, enter
'www' in the Source field. Just so you know, you can't host a subdomain on this one. - Hit 'Submit'
- Then make another CNAME with the hostname being "XH2ND7QLCMVP" and destination being "gv-DPCXNNU57UYLIJSOSBASYFF3UTPTDNAY2WUOF5VFPNMXGKMPAC5Q.domainverify.googlehosted.com."
*** You need to wait for Y! Domains to update your DNS settings. This may take an hour or so.
** this is using the updated Blogger interface **
- Go to your Dashboard and click the blog you wish to transfer.
- Click 'Settings' on the bottom-left portion.
- Go to 'Basic' under Settings.
- Under your blog's link, you'll find '+ Add a custom domain' CLICK it.
- The drop down menu reveals 'Switch to advance settings' HIT that.
- And type in www.domain.com or blog.domain.com or whatever you registered earlier.
- Hit 'Save' and voila!